This is default featured slide 1 title

Go to Blogger edit html and find these sentences.Now replace these sentences with your own descriptions.

This is default featured slide 2 title

Go to Blogger edit html and find these sentences.Now replace these sentences with your own descriptions.

This is default featured slide 3 title

Go to Blogger edit html and find these sentences.Now replace these sentences with your own descriptions.

This is default featured slide 4 title

Go to Blogger edit html and find these sentences.Now replace these sentences with your own descriptions.

This is default featured slide 5 title

Go to Blogger edit html and find these sentences.Now replace these sentences with your own descriptions.

Showing posts with label tricksntips. Show all posts

Saturday, 2 June 2012

Multiple Login in Google Chrome without any extension

Here is a Simple Tip.
You can login to many accounts you can login from your two facebook accounts also.
chrome is the most useful and great browser.
so everyone want to use it.


How to :

Go to Your Chrome Lgoin to Chrome with your Google Account.

Click on Setting Icon > New incognito Window or press Ctrl+Shift+N.


A New Separate window will open now you can open another facebook account thats it.

How to Access Hidden Themes in Windows 7


Windows 7 offers a good assortment of themes to customize the feel as well as the look of your computer. Windows 7 features particular themes which are based on the location and the language you select while you install the Windows 7. You can look for the location-specific theme in thePersonalize menu. You just have to right-click at any place upon your computer desktop. You will be able to get the couple of themes according to your location. 


Other than the location specific themes which you get by default, you can access hidden themes in Windows 7 which are offered to other regions. So the default themes which you get according to your region are not the only themes you can use. It is possible to access hidden themes in Windows 7 very easily in your system. This is what you have to do: 
Goto Start 
In the search box of the Start Menu type this C:\Windows\Globalization\MCT. 
Your Windows Explorer will show you a window with additional themes. These will be from Great Britain, South Africa, Australia and Canada. 

You have the option to select the wallpaper only or you can install the whole theme if you want. 

You can also download many themes for Windows 7 from different website including the Microsoft official website. But you should first try to customize and access hidden themes in Windows 7 as you might not feel the need to download additional themes from elsewhere after that.. 

Plz comment if u like this...

How to change the administration password on a guest account

If you are logged in to computer with some other account here are the steps:

Posing a Small Easy Hack For You Friends
I Hope Your Able To Read It I Know That Us Hc Members Cant Really Write English Apparently.?


If you are logged in to computer with some other account here are the steps:


1. Go to Start button click on run


2. Type CMD and press enter


3. A command window will open


4. Type net users


5. This will show you all the users of that computer.


6. Now type net user administrator * and press enter


7. This will ask you to enter a password


8. Enter the password you want to keep for the administrator


9. Re-enter your password to confirm it.


10. DONE


You have changed the password of computer administrator.
Now you can logoff that user and can login as administrator with the password you have just changed to .?


HAPPY HACKING Smile
Peggy

Edit your Friends Facebook profile

AsSaLaM-0-ALaiKuM Friends ZaRyAb is Here Today i show you How to Edit your Friends Facebook profile
its very easy and fun to do Biggrin

NOTE: this is for print screen purposes only. you can't get it to stay as you edited it.

so the first step is to download Firebug. (choose versions that is compatible with the your firefox version)

you can download it here: Click Here

upon downloading, install it then restart your firefox.

after restarting, open the profile of your friend that you want to edit.
highlight the text that you want to edit.
~ right click on the text, then click check elements.

then do your magic Biggrin

if you didn't understand this.
watch this: http://www.youtube.com/watch?v=5zXOLjv3o44

i've tried this already, trust me it works Biggrin

forgive me for my grammar. Thanks!

Friday, 1 June 2012

How To Shutdown Computers In Your Network + Pics

AsSaLam-0-ALaiKuM Friends ZaRyAb is Here Today I show you How To Shutdown Computers In Your Network + Pics

Step 1. Open CMD (Start > All Programmes > Accessories > Command Prompt)

Step 2. Type "shutdown -ip" & enter

[Image: ibqc3IItJjsWgT.png]

Step 3. Now pop-out remote dialog shutdown window.

[Image: iRejohitwPiTK.png]

Step 4. Now add computer names, restart or shutdown method, msg box as ur wish Yes

[Image: i5p0uXR060I8a.png]

Step 5. Now click "OK" button!

Good luck!!! Bye

How To Change The Icon Of A .EXE File

AsSaLaM-0-ALaiKuM Friends  ZaRyAb is Here Today i show you How to change The icon of a exe file 1. Download and extract Resource Hacker. You can find Resource Hacker at their official site here - Click Here TO Download

2. Open Resource Hacker (ResHacker.exe)

It should look like this:

[Image: 70591419.jpg]

3. Click File - Open


[Image: 49529247.jpg]

4. Browse and find the file that you want the icon changed on. Click on it, then select Open. For my tutorial, I will be using server.exe

[Image: 79487979.jpg]

5. Now click Action - Replace Icon...

[Image: 12453166.jpg]

6. Click Open file with new icon...

[Image: 90115117.jpg]

7. Browse for the Icon File or Exe File that you would like to set the new Icon as. Select the file and then click Open. For my tutorial, I will be using the Pandora Radio Icon.

[Image: 54707557.jpg]

8. Now click Replace

[Image: 76233996.jpg]

9. Finally click File - Save

[Image: 83146596.jpg]

10. Your file should now have the new icon you selected as shown below:

[Image: 77586100.jpg]

You have now sucessfully changed the icon of the file you wanted!
Remember me in your prayers........

Cyberghost one month free premium VPN for free!!!

Hi, Friends. ZaRyAb is Here. Today I will show you how to get one month free premium vpn of Cyberghost.

Cyberghost has recently released a new VPN client, and to celebrate this they are charitable one free month CyberGhost Premium VPN with access to all servers, 1 GB traffic volume included. To grab your free 1 Month Premium VPN, go to this link, scroll down and click “Download” to download the new version CyberGhost client. During installation, you will be questioned to enter your email address to get Get 1 Month Free.

See the screenshots for how to install it:

[Image: mA3au.png]
-

[Image: zNCw3.png]
[Image: YU6kv.png]

[Image: sZDY6.png]

[Image: 3fLF9.png]


Enjoys guys!!!!


Thursday, 31 May 2012

Login To Same Site With Multiple Account in Firefox

AsSaLaM-0-ALaiKuM friends zaryab is Here today i show you 

how Login To Same Site With Multiple Account in Firefox

Once you may have desired to login to same website with two or many accounts. This time you want to do something nasty, or increase your productivity in a forum. Your basic techie mind will say to open the entire installed browsers and also enable private browsing for each of them.


For example, open Google Chrome, Firefox and Internet explorer all at once and login to the site with different user name from each browser. You’ll be able to use 3 usernames. Again open private browsing and login to the same site with another 3 new usernames. This time you’ll have 6 user logins in same site.

You might be quite familiar with the above trick but the main drawback is – you’ll lose your processing power since 3 browsers are working actively. And this might not be practical to you if you have low system specs.

But with some extension added to Firefox, you can do it all in one browser. Multifox is an extension that allows Firefox to connect to websites using different user names. Simultaneously! For example, if you have multiple Gmail accounts, you can open them all at the same time. Each Firefox window, managed by Multifox, accesses an account without interfering each other.


Let’s have a try to Multifox.

To install Multifox add-on in your Firefox, go to Multifox Homepage and click on Install Extension button. Be sure that you are browsing from Mozilla Firefox (not Firefox 4 Beta). Multifox is not supported in Firefox 4 Beta versions.


Install it as you do with other Firefox Extensions, for more clarification see the image steps below:
And Restart your Firefox.
Now you’ve successfully installed new extension to your Firefox.
Let’s play with it.
Go to File and click on New Identity Profile.
This will open a new window of Firefox Browser. Make note of that at the most right corner of the address bar.
This says that it’s the second window. Opening the new tab or new window with Browser window 2, you’ll have the same session for all the new windows and tabs.
But in case you repeat the same process (Go to File and click on New Identity Profile), you’ll have another new session browser with indicated in it.
In this way you can access unlimited number of accounts in same website with different username. For example, if you need to access 5 Gmail accounts you will need 5 windows with different identity profiles.

Wednesday, 30 May 2012

Fool your Friends With Pentium 5 i11 processor

Fool your Friends With your Pentium 5 i11 Processor


Making fool of friends,colleagues  is the most entertaining task. This post would show you a method by which you can change the hardware description of your computer and fool your friends into believing that you have the latest version of processor which is yet to be launched . :D 

Just follow the simple steps as follows:

Step 1. Go to . Start.. Run ... and type regedit.


This would open the registry editor.


 Step 2. Select  HKEY_LOCAL_MACHINE as in the picture above and expand its contents.


Step 3. Similarly select HARDWARE then DESCRIPTION then CentralProcessor and finally select 0.

Step 4. On the Right hand side of the window as you see in the picture . Right Click on ProcessorNameString and click modify.

 Step 5. Modify the name to any name you want. Lets say Pentium 5 i11  as show below.


 All done. Hit ok and close the Registry Editor. Now check the system properties by right clicking on MyComputer and select properties. You would get something like this.


Have Fun and fool your Friends with this Newly upgraded PC of yours.

Tuesday, 15 May 2012

Save Any Web Page As a PDF E-Book

Do you ever wanted to save web pages as PDF E-Book ? Everyone does. Unfortunately there is no inbuilt options for that to export as PDF in web browsers like IE,chrome or firefox. But this awesome firefox addon makes it possible.


However for full access to all their features, you need a license, but the basic mode is free to use. Just download the Firefox extension, install and restart browser.

Step 1: Install save as PDF .

Step 2: Visit the page you wanted to process.

Step 3: Click the plugin icon appears just before the address bar descripting save as pdf.

Step 4: Download the file in pdf.


Save Any Web Page As a PDF E-Book

Do you ever wanted to save web pages as PDF E-Book ? Everyone does. Unfortunately there is no inbuilt options for that to export as PDF in web browsers like IE,chrome or firefox. But this awesome firefox addon makes it possible.


However for full access to all their features, you need a license, but the basic mode is free to use. Just download the Firefox extension, install and restart browser.

Step 1: Install save as PDF .

Step 2: Visit the page you wanted to process.

Step 3: Click the plugin icon appears just before the address bar descripting save as pdf.

Step 4: Download the file in pdf.


Wednesday, 9 May 2012

Compress 1GB File to 10MB


Assalam-o-alaikum friends ZaRyAb is Here. today i show you compress 1gb file to10mb

KGB Archiver is free and open source software which compresses 1GB file to 10MB file. Data compression utility of this software is based on PAQ6 algorithm which has AES-256 powerful encryption. KGB archiver works on both Windows and Linux operating system. Compression ratio of this software is very high. Due to high compression levels, time to compress a file goes high as the size of the file increases and compression ratio may vary depending on the format of the file.
When a file is compressed with KGB Archiver it saves it with own extension and at the time of
decompression it automatically recognizes the file format. The only limitation of KGB archiver is, decompressed file cannot be open or extract with other compression softwares. You can also choose any compression level (high, maximum, normal, low, very weak) to compress a file but the compression time  will vary according to your selected compression level.

Note: If you are compressing any file with KGB archiver and sending the comprssed file to your friends then he must have KBG archiver installed on his computer to decompress the file.

System Requirements:


Due to high compression ratio of KGB archiver, you need to have a decent system hardware configuration
  • 256 MB RAM
  • 1.5 GHz Processor

Features of KGB Archiver

  • Supports native .kgb files and .zip files
  • AES-256 Encryption
  • Able to create self-extracting archives.
  • Multilanguage supports like Arabic, German, Greek, Japanese, Spanish many more.
  • Unicode is supported in both User Interface and File Systems.
  • An Explorer shell extension is available for the windows version.
  • Make Password protected compressed file.
download link:


Note: This KBG Archiver software cannot compress video format files.

How to Delete Your Facebook Account

Assalam-o-alaikum all friends. ZaRYaB is Here. today i show you how to delete your facebook account

Facebook offers two options for those who want to get rid of their account. The first one is to deactivate it, and the second one is to permanently delete it. Next we will clarify the difference between these two procedures and we will see how to perform each one of them.


Deactivating your account

When you deactivate your account, your profile and all its associated information are immediately made inaccessible to other Facebook users. Although this means that you effectively disappear from the service, your information will remain saved by Facebook so that you can reactivate your account whenever you want after 24 hours have passed since the deactivation.


By using this procedure, many users deactivate their account for temporary reasons, and when they return to the service, they recover their “list of friends” and their photos, just as they were before they left.

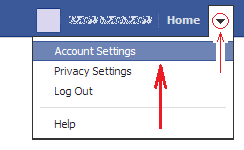
To deactivate your account you must click on the small triangle at the top right hand corner of the page and then select the option that says “Account Settings.”


Once you have done that, in the left hand menu, click on the Security option, which is the one indicated in the next image:
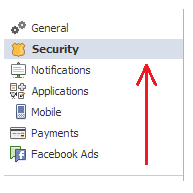

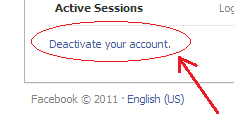
Then, near the bottom of the screen, click on the “Deactivate your account” link:


To complete the deactivation you will have to choose your reason for leaving from a list of options and then click on the Confirm button. This will open a pop up box asking for your password: Enter it and click on the Confirm button. Finally, you will be asked to read a captcha text and enter it. Do so and click on the Submit button. This will lead you to Facebook's home page, where you will see a message confirming that your account has been deactivated.


Permanently deleting your account

Facebook also offers an option for those who want their account deleted with no chance of recovery. This option is only accessible in this link, which is provided in the Facebook Help Center when you type “delete my account” in its search box.

Once you have opened the page of that link, you must click on the Submit button and then, on a pop up box, you must enter your account password and a captcha text. Once you are done with that, click Okay. Facebook will ask you to confirm the action, so you will have to click on an Okay button again.

Although your things will disappear from Facebook once you have done that, to finish the deletion process you will have to avoid logging in to your account during the next 14 days. After that period of time your information will be no longer available, never again.

Open multiple Yahoo Messenger windows on a single PC

clip_image002
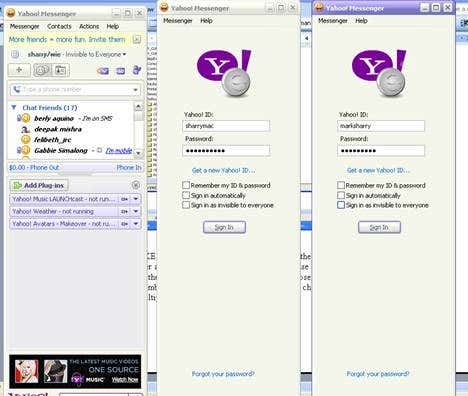
People love to chat, especially these days since they can now talk to, hear and see someone who is miles away from you. Nowadays, the most popular chat program is of course the Yahoo messenger. With the ability to create new profiles with Yahoo, wouldn’t it be nice if you could use this program with different IDs concurrently on a single PC? Thankfully, there is a solution. Here are the steps:
First, you will need to access the registry editor to change the properties of the Yahoo Messenger program.
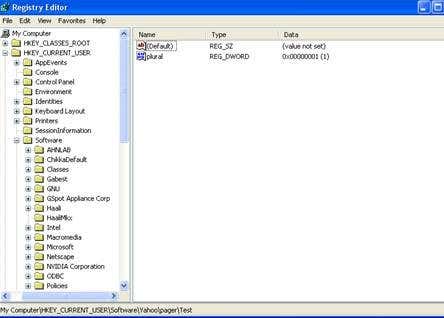
To do that you need to click on the start button, go to run and type regedit in the box then press OK. You will then get this page.
From the registry editor locate the HKEY_CURRENT _USER folder and go to the Software folder. Next, you need to look for the Yahoo folder and click on pager. Right click your mouse and click on the DWORD option.
Change the value name to plural and you may choose form numbers one to three for the value number. And click the OK button to save the changes done.
clip_image004
There you may now enjoy a multiple messenger. Enjoy chatting!

How to find Who Unfriend You in Facebook

Hello Friends  ZaRyAb is Here And Today i Show u How to Know Who unfriend You In Facebook So Lets Start

First Go To This LInk click here
And Click Log With facebook Check The Box On The Condition of Service {Terms And Use}


Now Click On Allow


And See Who Unfriend You :D Plz Comment